This is a short workshop for changing the ignition switch on an Avensis 2.0 1999.
I've had problems with starting the engine since beginning of summer. The symptoms were like this;
when turning the key to the START position, nothing happens. You have to, either turn it from ON to START a few times or wiggle the key while holding it in the START position, to get connection in the lock to start the motor. ![]()
![]()
This is due to a faulty switch behind the locking barrel, that has been worn down so it does not alway connect. This has nothing to do with the imobilizer system or coding of keys, it is only a mechanical problem and will not be solved by re-coding the keys or such.
![]()
Be ware, the dealer gave me the wrong part on my first order;
I described the symptoms and where the part is located and they knew exactly what I needed, after a long search in their computer they came up with the part I nedded. It was not in stock so they ordered it.
What I got was a part called something like Coding Unit/Computer Unit remote control (PN 89780-05011).
It's a part in black plastic casing with the front ring around the keyhole (with the text ACC/ON/START) and a short cable with a connector. This is the receiver of the coded keys and it is the wrong part, also it's more expensive and doesn't solve this problem.
When I called them on the phone and described the symptoms again and told them I've got the wrong part, they looked again and came back to me saying that it was the correct part I've got.
After a little convincing that I had a mechanical problem and not a computer problem, he discussed with another guy and finally they found the correct part.
I've had a lot of help from member GnzYza in 'Problems with starting', where you can read how it all started.
Once again, thank GnzYza.
1. First you need to get the new part from a Toyota dealer.
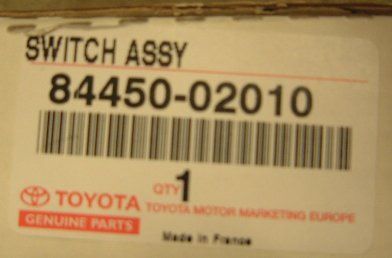
The part you need is the SWITCH ASSY, partnumber 84450-02010 (at least for my Avensis -99, but it gives you something to start with at Toyota).

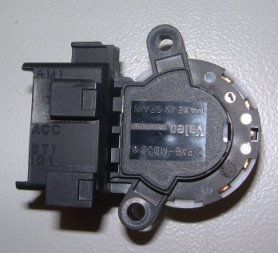

2. Disassembling.
You'll need a cross/pozidrive screwdrive of medium size, that's all you need.
(It might come in handy with some kind of light because it's rather dark behind the dashboard)
First remove the dash casing below the steering wheel, there are 2 black screws, one to the left...
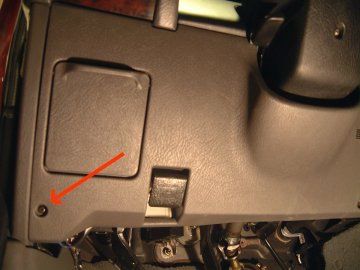
...and one to the right and also the golden screw under the cowling.
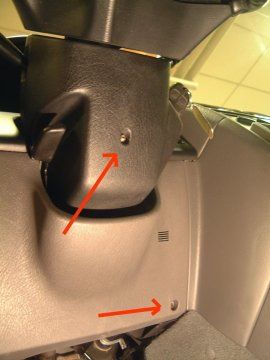
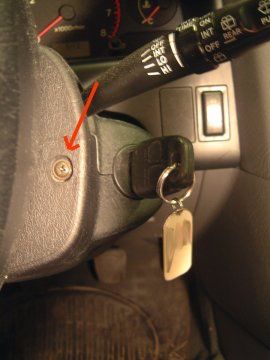
Turn the steering wheel so you'll see the last 2 screws behing the wheel...
to the left...
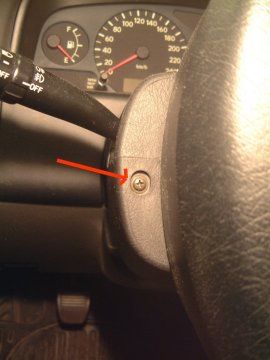
...and to the right.
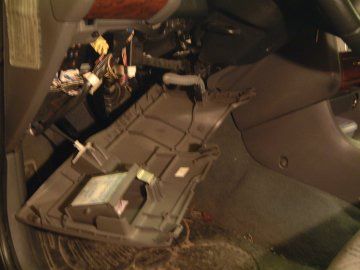
3. Carefully pull the dash casing a bit outwards in the bottom and slide it down to remove it. There are 3 things stuck to this part; the wire for the front hood, an airtube and a wire with connector on it. These can remain in place, just put the casing on the floor.
4. Separate the top and bottom parts of the cowling, there are only small plastic lockers holding them together now, so a little bending with a screwdriver in the joint between them would do it. The joint is on both the left and the right side, you'll see it clearly if you look close.
The top one could needs not to be removed, but the bottom one does. It might be easier if you loosen the locking handle for adjusting the height of the stearing wheel.
5. Now you should have access to everything under the cowling. Don't be alarmed, it is not so much you have to care about, it is just very much cabling in a very tight space.
Locate the rear of the ignition barrel, where you'll find following parts attached to it:
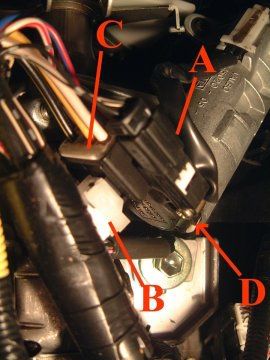
A and B are just connectors placed on the Switch Assy, remove them, but don't disconnect them.
C is the connector on the Switch Assy. Disconnect it and fold it away.
D is the actual Switch Assy. The arrow points to one of the two screws that holds it in place. (The easy one...)
6. Change the Switch Assy
Remove the two screws that holds the Switch Assy to the rear of the barrel. One is easy to get at, but the other one is rather tricky to access.
The screws might fall off so don't loose them!
Once they are removed, pull the case of the Switch Assy away from the barrel. You can't pull it off all the way, so you'll have to turn it 45 degrees and try to get it out sideways. There are no loose parts there so you are rather free to remove it any way you can. Just keep in mind how you did it since you have to get the new part in, the same way.
7. Assembling.
Place the screw that was hard to get at, in it's hole on the new Switch Assy before placing it in position. It is very hard to get it in place through all cables.
Now, just tighten the screws for the Switch Assy, re-connect the cable (is only one way), fit the two connectors you removed in the beginning, and you're finshed with the hard part.
Fit the bottom part of the cowling again, remember to have all plastic notches in their place. The parts will lock together nicely, fit the 2 screws behind the steering wheel again and also the bottom one.
Place the dash casing in it's place; top first them push in the bottom. Screw it tight in place.
8. Finished.
This is not a hard work and it took me around 25 minutes (including taking the photos). After that my car has started without a problem.
The Switch Assy costed 900 SEK (> £60) but the garage told me they would charge me around 4500 SEK (>£300) to do the change. I don't know how they'd charge me so much for this easy job and now that I know how easy it was, I'd never accept a bill from them with that amount.
I hope this workshop will help somebody in the future, if so, please post you comments on it.
Good luck.


